

Dear Reader,
Greetings again from the Forge! My travels have taken me all across the country, and now that I am finally back for the foreseeable future (probably), I'm excited to be getting some games in again. I've also been painting up a number of Fantasy, 40k, and Blood Bowl miniatures, so the Forge has been very busy, :)
I took some time on Thursday to get together with Donatello for some gaming, as I wanted to test out my new Easterling force that I've been hinting at for quite a while, but haven't shown you all yet on the blog. When I was first looking at LOTR SBG, I knew that someday I wanted to have a Rohan and Grey Company force. For my army of Evil, I was immediately torn between an Uruk Scout force and the Easterlings, as both provided things I prized. I wasn't able to acquire my Easterling army until recently, and now that they are painted and ready for use, fielding them in an army feels like a dream come true in many ways. We'll see how they work, :)
This battle report will be a To the Death scenario, with the special Arkenstone twist that we tested at the TMAT GT II (because I didn't get to play on that map, and it looked like so much fun, :) ). For this battle, Don opted to use my Rohan force, as 1) he's never played with Eomer, though he's been on the business end of the Third Marshall on multiple occasions, and 2) he would have the advantage of numbers and ranged firepower in the battle (which Rohan usually never has). So to set the stage, these were the armies we were using:
The Host of Rhovanion (LOME, Easterlings)
-Khamul on armored horse (Army Leader): 135 pts
-Dragon Knight: 70 pts
-War Priest: 60 pts
-20 Easterling Black Dragons with shields: 200 pts
-10 Easterling Warriors with halberds/shields: 90 pts
-1 Easterling Warrior with banner: 32 pts
-2 Easterling Warriors with bows: 16 pts
TOTAL: 603 pts, 36 units, 6 Might, 2 Casters
The Might of Rohan (LOME, Theoden's Host)
-Eomer, Knight of the Pelennor Fields on armored horse (Army Leader): 130 pts
-Captain of Rohan with heavy armor/shield: 55 pts
-King's Huntsman: 50 pts
-3 Rohan Royal Guards: 30 pts
-3 Rohan Royal Guards with throwing spears: 36 pts
-1 Rohan Warrior with banner: 32 pts
-16 Rohan Warriors with shields: 112 pts
-7 Rohan Outriders: 49 pts
-12 Rohan Warriors with throwing spears/shields: 108 pts
TOTAL: 601 pts, 45 units, 7 Might
This will be an interesting battle, as we are both sporting banners, which means that we can gain Victory Points in our match if either of these models survive. Usually in the games I play there is only one player who will sport a banner (and he's usually me, by the way), meaning that if the scenario rules add extra points for banners that survive, one team is solely focused on defending the banner, and the other is solely focused on chasing it down. In this match, we will both be playing offense and defense in defending our banners, while also being careful not to risk our army leaders, as they also give points to the opponent if lost.
This is my first game using my new Easterling force, and as I'll explain in a tactical post soon, this is a slightly softer build that most of the Easterling forces you've seen on this blog. Instead of relying on multiple killing heroes or a killing hero with supporting captains (the favored choice for Zorro and the Black Prince's major hero being Amdur and/or Shagrat), this list uses casters and a Dragon Knight to provide a wider array of options and functions for your hero core. It also means that I spend almost 250 points on my heroes alone, making my force a bit smaller than those of my compatriots. Just comes with the territory, :)
Strategy for Glenstorm: As this is the first time I'm using Easterlings, I'm a bit uncertain of how to play against one of my strongest civs (as I've invested a lot of time, energy, and cash into my Rohan force, and I'm very proud of it). My plan is to use Khamul as my "fling fighter," and use him to "thread the needle" through the Rohan lines to make a mess of any flanking attacks he wants to call. I can also use him to disrupt his archer core if he keeps them back. Other than that, I'll pass on casting Fury with my War Priest, and instead focus on 3 casts of Bladewrath, so that I can make Khamul or the Dragon Knight S6 for the duration of the Fight Phase - optimally, in rounds where they are calling heroic combats. So, to call the ball: Khamul will harass and distract from the main battle line, the phalanx of infantry will engage the models and setup the heroes, and the Drag Knight will focus on raw firepower and overpowering of infantry. Honestly, I don't have a good counter for Eomer: he's a powerful hero, and I lack the strength to meet him with any of mine. We'll play it by ear as far as he's concerned.
Strategy for Donatello: I've never beaten Glenstorm yet, but I think I can pull it off with this army. I've seen Glenstorm use Eomer as a devastating flanking hero, so I'll pull him around the side, and use him to engage the fringe units before striking at his pike and banner support. I'll use my Royal Guards as a solid D6 core to hold the main line while my Captain and Eomer move around the flanks to trap the front line. My aim is to bring him quickly to 50%, engage his heroes, and then force him to courage test in the critical rounds.
Scoring
Today's match will be a straight-up To the Death scenario, with the following rules:
- Game ends when one force is reduced to 25% or less of its starting models
- 2 Victory Points are awarded for killing the enemy army leader
- 2 Victory Points are awarded if a team has a banner remaining once the game ends
- 1 Victory Point is awarded if the enemy force is broken at the end of the game. 3 Victory Points are awarded if the enemy force is broken and your force is not broken by the end of the game.

...And with that... (For death and glory!)
Turn 1 (P: Rohan)

Turn 2 (P: Easterlings)
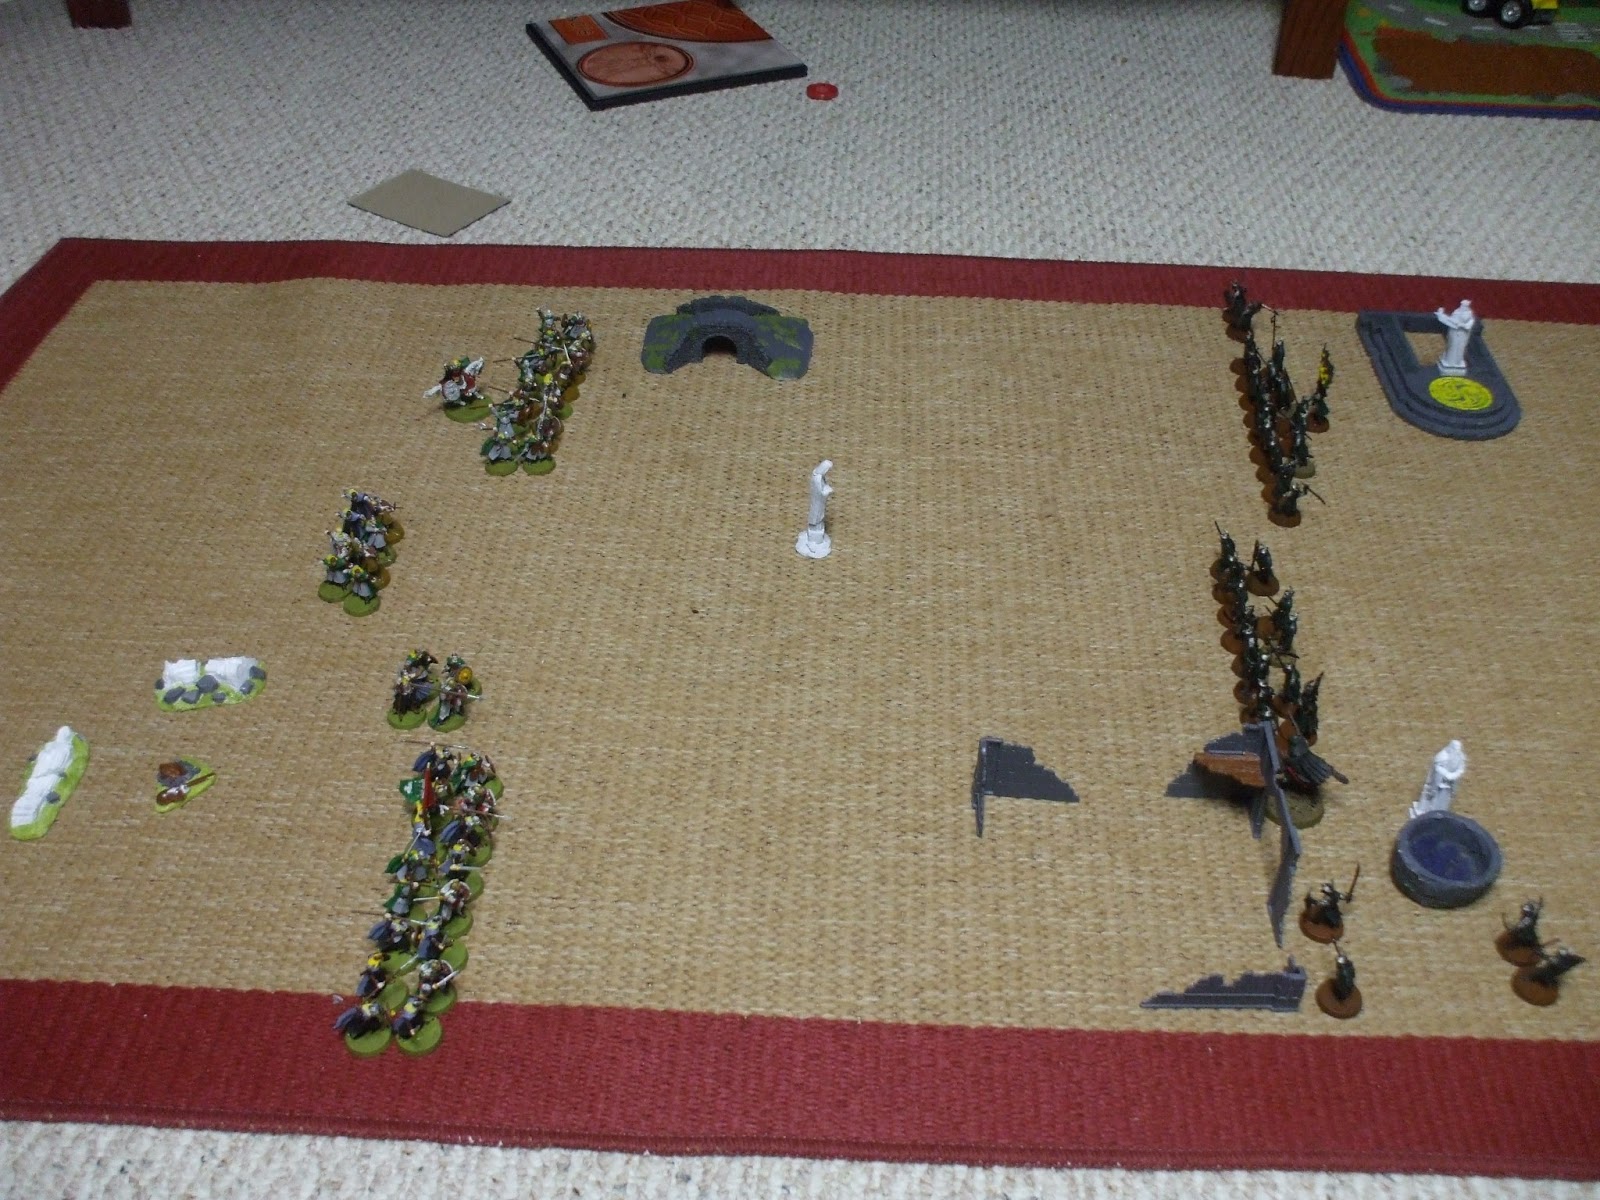
The armies continue to move toward each other, and the Rohan archer core moves up 3" to setup their shot against my main battle company. Eomer continues his drift toward the far flank as I move Khamul closer to the center of the board.

In the shoot Phase, my two archers fail their rolls (which is expected), and Don responds by taking down two of my swordsmen with his outriders (Hawk-Eye and someone else quite forgettable). The Huntsman messed up his shot, though, so it could have been worse. With no melee combats, we move to Turn 3.
Turn 3 (P: Rohan)

The armies continue to advance toward each other, with the Rohan force near the bottom of the screen still in a solid block, and the force at the top of the map now broken into two teams around the bridge, where Eomer has placed himself. After my movement, Eomer is now just about in charging range, and the throwing spears are almost in range. My archers line up to shoot into the large body of infantry, and his men continue to size up my center block. I declared a magic attack with Black Dart against one of the Royal Guards with Khamul using 2 Will (2/12W), but I did so before looking at the casting value: instead of the usual 5+ casting value, Khamul casts Black Dart on a 6! Naturally, I didn't hit him, and I have since decided that I'll likely forgo casting that spell again in the future, :-/
In the Shoot Phase, nothing of note happened. The King's Huntsman targeted Khamul (because if I wounded him and he failed his Fate rolls, I'd be in really good shape to in the game at the get-go), but he failed to wound (thankfully, :) ). Next round we will begin melee combat, so before we begin any of the Fight Phases next turn, a quick note on the kill count so far:
Easterlings: 2/36 (16 to break), Rohan: 0/45 (23 to break)
Turn 4 (P: Rohan)
...And the battle is joined! Unfortunately, in our desire for blood and glory, I forgot to take a picture of the Move Phase. You'll see everything in the pictures that follow, though. Don split the bottom block of infantry into two groups, one peeling off into the ruins of the manor house, and the other preparing to meet Khamul and the War Priest's block of infantry. The upper blocks of Rohan infantry came around the bridge and formed a defensive line to attempt to block me from accessing the arkenstone (a wise move, as my banner is in that block, and thus keeping me to a 3" banner advantage from the arkenstone will limit where I move in future rounds). Eomer opted to stay on the bridge instead of moving up (as I want the drop with him on Glenstorm's force, and I don't really need him in combat this turn).
I charge both of my blocks of infantry into Don's battle lines, and the War Priest pays 1 Will to cast Bladewrath on Khamul (on a 2+). Now, usually I'd be like, "There's no way he'll roll a 1 on Turn 4," and just roll the dice. This time, I had this really bad feeling of, "I'm going to have to burn my Might point early, aren't I?" And sure enough, I was right, :) I got Bladewrath off, using 1/3W and 1/1M, so Khamul will now be Strength 6 for the Fight Phase.

Don had a pretty effective Shoot Phase considering that he was shooting at D6 with his archer core. His archers take down a halberd (the Huntsman missed again, by the way), and one of the throwing spears wounds the War Priest, who fails his Fate save (1/1F, 1/2H).

Up top, one of the throwing spears takes down one of the halberds as well. My two archers again do nothing, :)
As we head into the Fight Phase, I called a Heroic Combat with Khamul (because that's what you do when you're S6 for the Fight Phase, :) ). I paid 1 Will to get +1 attack until the end of the Fight Phase, giving me 3 attacks on the charge.

I won the fight, knocking the two swordsmen to the ground. I deal three wounds (bringing me back up to 12W), paid 1 Will for being engaged in combat (1/12W), and then slung Khamul into an archer for some wounding on 3s, and the Huntsman to take advantage of a F3 low-defense heroes, :) Good times, :) (I'll be honest: I didn't expect that, and should not have moved up that far with my archers. This...can't end well...)

In the Fight Phase, my Black Dragons fend off the Rohan on the far side of the Manor House, and my battle-stave and halberd support fells two Royal Guards and a warrior with shield. So far, no casualties for me on the far side (which is good, because my caster is about to get swarmed by the onslaught of Rohan swordsmen).

The Rohan Captain wins his fight against the Black Dragon (2/2M) and wounds him. One of the other Black Drags takes down one of the swordsmen to return the favor.

And on the far right, the battle is extremely lop-sided: three of the four Rohan warriors fall in the opening round of melee combat, giving me vast supremacy on this side of the board. It also means that if I get priority next round, I'll be able to handily charge Eomer, taking away his S5 and his bonus attack on the charge in a critical round of melee combat. (Glenstorm's right: I badly need priority in this upcoming round)

Up top, Khamul wins the fight on a 6, knocks them over, wounds the archer twice, but only the 4 wounds the Huntsman, which he Fate Saves with a 5 (1/1F). These three wounds bring me back up to 12W, and then I paid 1W for being involved in combat (1/12W). All told, a very effective round of combats for me.
Kill count: Easterlings 5/36 (13 to break), Rohan 10/45 (13 to break)
Turn 5 (P: Rohan) (Yay!!!)

So, I mentioned near the beginning of this post that I didn't really have a plan for Eomer. That's still true, :) Don opted to charge Eomer into my fireteam on the far right (top of the picture), which is good because he could have slung him into my Dragon Knight, and that could have ended very poorly. The rest of his men engage me, surrounding Khamul with his archers, and standing up the Huntsman and moving him away (to avoid any further wounds in close combat with Khamul - he's out of his league). He also rushes two infantry at my archers, one of whom will gain added protection from the wallpiece.

One of the Rohan spearmen wounds a Black Dragon on the charge with his throwing spear, allowing him to begin wrapping around my main block.

The War Priest gets off Bladewrath on a 6 on Khamul (2/3W), so even though he will not be charging this round, he will be S6 when fighting the archers. That should help a bit. No one had any shots in the Shoot Phase, so we move straight to the Fight Phase.

In the Fight Phase, Eomer (1/3M) and the Drag Knight (1/2M) both call Heroic Combats. The Dragon Knight kills his man, and moves in on one of the two Royal Guards on this side of the board. Eomer wins his fight on a 6, knocks over all three of his opponents, handily wounds the first and third on a 5 and 6, and then promoted one of the 4s against the second Black Drag to a 5 (2/3M). He then slung around to the rear of the main body, engaging one of the halberds and my banner (which is really bad news, because he gets to call the order of combats, and my halberd cannot shield now, because the banner does not have the shielding rule...see, I told you I didn't like this guy...).

In the other fights, Khamul paid 1 Will to add +1 attack, won the fight, and wounded two of the archers on 3s (dealing 2 wounds, bringing him back up to 12 Will before losing 1 for the combat - so I'm back to 1/12W used).

On the far left, one of the Rohan Warriors killed one of my archers (big loss, I know), but otherwise I am still boasting a solid battle line on this side. Don lost a Royal Guard and a Rohan Warrior, but otherwise he is consolidating his strangle hold on my block of infantry.

On the other side, the lone Rohan Warrior fends off the three Easterlings, and Eomer handily defeats the banner and the halberd in one fell swoop (5 kills for the Third Marshall so far, worth over half his point value - I love this guy and hate his guts all at once, :) ). One of the Rohan Warriors also succeeded in killing a halberd, and one of the Rohan spearmen fell to a Black Dragon. The lone Royal Guard left on this side of the board is still holding strong, rebuffing the attacks of the Drag Knight. With that, we prepare for Turn 6.
Kill Count: Easterlings 12/36 (6 from break), Rohan 17/45 (6 from break) (this is a really close game - we were both amazed at how this proceeded each round!)
Turn 6 (P: Easterlings)

Don wasn't excited about the prospect of me overwhelming Eomer, so he opted to call a Heroic Move with Eomer (3/3M). Eomer and most of the Rohan Warriors with him, as you can see, opted to fling themselves into the battle near the manor house, with Eomer tagging the War Priest (which is a *really* bad match-up for me). Khamul used 1 Will to cast Black Dart on the Huntsman and failed (2/12W), and then charged him, causing the rest of the archers to surround me when Don's Move Phase came.

To setup the attack on the secondary body of infantry, the "Warden" (Rohan Spearman with a spear on his back, center-left) killed one of the Easterling halberds with his throwing spear on the charge, and then moved in on the other Easterling halberd, keeping me from spear supporting in any of my fights this round. For Rohan, this is absolutely critical for survival, as they cannot spear support with their army. With no shooting, we move to the Fight Phase.

I called a Heroic Combat with my Drag Knight, as I was planning on killing the Rohan Captain with the 12 dice I was rolling against him. We won the fight (yay for higher FV), he was trapped, and we rolled to wound. A 6 is required, as the Drag Knight is D7 - and as you can see, only 1 of the Easterling Black Drags managed to wound him, :-/ What really bites is that if I had Bladewrath on my Drag Knight this round, we would have had the 3 necessary wounds to end the fight (with his two 5s). Instead, now I have a Drag Knight with no Might points who is tied down fighting a D7 shielding minor hero who costs less points than him, :-/ If anything good came from this combat, it's that Don failed the Fate save, so he's now used 1/1F and 1/2H.


...But this guy wasn't having a bad round. Yeah...just, yeah. Very dead War Priest. There were a lot of shielding victories this round, though two Rohan Warriors (including the poor Warden) fell to the Easterlings.

On the far side, the poor Rohan Warrior loses the fight, is trapped, and gets royally whacked by the surrounding Black Dragon and halberds (he held the flank for a long time, though) (that he did - and my boys are now so far away from the fighting that they'll spend next turn just moving).

On the far left, my two Easterling Black Drags are still holding firm against the Rohan Royal Guard onslaught (those guys should be dead by now...), and my valiant archer, when ganged on 2-1, not only wins combat, but wounds the guy next to him! I was so proud of the archer that almost paid for himself after doing nothing beyond tying down a model or two for two turns. He is the representation of my general philosophy toward archers (which I've mentioned in a past post): when you read "archer," read "swordsman," as that's the more reliable way for them to pay for themselves.
Kill Count: Easterlings 14/36 (4 from break), Rohan 22/45 (1 from break) (lucky dog... ;P ) (that's right... :) ) (If I win priority next round, I think I win: I can charge Eomer, my Drag Knight can finish off the Captain and move on to the Huntsman, and Khamul can engage archers on the ground. That's the plan.)
Turn 7 (P: Easterlings)

True to my word, I had a chance to catch Eomer flat-footed, and engaged him with my token "Suicide Bob" model, and then began to track down all of the remaining Rohan. Khamul opted to charge into a few of the infantry (as you can see), primarily because I'm running out of guys on that part of the field. Seeing as the Huntsman wounds Khamul on 6/4+, I'm not too worried about leaving him for a round.
Turns out I was right: the Huntsman targeted a halberd in the Shoot Phase, missed him (*hangs head* I give up on this guy...), and nothing else of interest happened. We move to the Fight Phase.

Then the unthinkable happened: the Rohan Captain shielded on a 6, and my Drag Knight and Black Drags only got a 5 high, :-/ As we backed up, I saw a lot of firepower wasted on a critical turn. Bummer, :-/

Near the manor house, Khamul paid 1 Will to add +1 attack, loses his fight against the shielding warriors (I know, right? Who does that?!?!?!), and then loses another Will point because he was engaged in combat (5/12W). That's...so not cool, :-/ Eomer killed Suicide Bob (as you can imagine), and the Rohan Warriors went to town on my men, killing three Easterlings without a single loss (YEAH BUDDY!!!). I'm still amazed at how effective his boys were this round: he rolled a lot of 6s.

On the far left, one of the Royal Guards falls to the Black Drag (this is not how this part of the battle was supposed to go! :-/ ), and my archer successfully defends again against this Rohan Warrior. The result of this round is quite interesting:
Kill Count: Easterlings 18/36 (broken), Rohan 23/45 (broken) (Bet you didn't see that coming at the end of Turn 6! :) ) (Neither did we, :) )
Turn 8 (P: Easterlings)
Glenstorm Strategy: Okay, I need to whittle this force down to 11 guys ASAP. My plan is to engage the heroes, make a lot of the warriors test, and hope that this allows me to win the game quickly. Oh - and my guys have to pass their courage tests, :P

As I begin courage testing, I'll give you a slight spoiler alert: the guys that run for the next few rounds are ironic in when and with whom they choose to run. You'll see soon, :) Khamul passes (Test: 16), and charges the warrior near the banner as he calls, "Stand Fast!" The Drag Knight passes (Test: 14), and engages the Cap. After he calls, "Stand Fast!" all of my warriors are covered except my archer, who runs (Test: 7) All of Don's heroes were engaged except the Huntsman (I couldn't reach him without flinging Khamul into the middle of nowhere, so I opted to let him stay), and he passed his courage test (Test: 11). The Huntsman is able to cover everyone except the two swordsmen on the far end of the manor house, one of which runs away (Incidentally, the guy who has been in a 2-1 against an Easterling Black Drag with a Royal Guard, and has been of the safest guys in the game to date. Go figure...). With no shots, we go straight to the Fight Phase.
I feel bad that I forgot to take a picture, but as you can imagine, adrenaline was running high at this point, :) The amazing thing was the number of defensive victories - there were very few casualties this round. The Cap pulled off his shielding stunt against the Drag Knight again, and other than the poor axeman that was fighting Khamul, Eomer killing his man, and the swordsman on the far side of the manor house, there were no other casualties this round. So, with only three men dead and two men retreating, we end Turn 8.
Kill Count: Easterlings 20/36 (7 from game), Rohan 26/45 (8 from game)
Turn 9 (P: Rohan)

We called this round, "The Round When Everyone Ran Away," as there were no less than five models that ran from combat. And not just any models: the Captain of Rohan failed his test on a 4 (Test: 8), though Eomer passed his (Test: 11), as did the Huntsman (Test: 14). He engaged Khamul and swarmed a number of my infantry. This didn't stop the Drag Knight from failing his courage test on snake eyes (Yeah...who does that, too?!!?!?!), as do three other Easterlings. This creates a problem, though, even deeper than the fact that the men that I badly needed to peel off multiple attackers are gone - I'm also three models away from losing the game. I need a ton of kills this round in order to pull this battle out. Nothing happens in the Shoot Phase, so we go directly to the fighting.

...And we see a lot of carnage! Khamul paid 1 Will for +1 attack (down to 6/12W), wins his fight, and manages to kill the Royal Guard, gaining 1 Will which he promptly loses. My Black Dragons pulled off a lot of defensive victories around Khamul, but Eomer more than made a mess of things by killing two of my Black Drags in his combat. This puts me at 1 model away from 25%, and Don is 6 models away from 25% with a much better spread of units on the board.
It was at this point that we realized that the entire match came down to one critical move next turn: whether or not I can kill his banner without losing Khamul. If I don't kill his banner, the points will look like this:
- 1 VP each for breaking the other army
- 0 VP for killing the enemy army leader
- 2 VP to Don for having a banner at the end of the game
This means that if I don't kill the banner and Khamul survives, I gain a 3-1 Major Loss. If I kill the banner and Khamul dies, I still lose 3-1. If I don't kill the banner and he manages to kill Khamul, it will end as a 5-1 Major Loss, and if I can keep Khamul alive and kill the banner, I can pull out a 1-1 Draw. Everything rested on priority for Turn 10...
Kill Count: Easterlings 26/36 (1 from game), Rohan 28/45 (6 from game)
Turn 10 (P: Easterlings!)
Okay - do you remember how I told you courage tests were ironic? Well, if you didn't find the Drag Knight and Captain walking off together ironic enough...

...Count up the guys at the top that failed courage tests: there's one Easterling (which means the game will end at the end of this round), and 5 Rohan Warriors (which means that if Glenstorm kills my banner, I will also be brought to 25%...wow...) (yeah...just, wow...). We quickly realized that only Khamul's charge mattered, though we did all of them. We started with Khamul's, though, as it held the fate of the game in its hands.

And in typical style, Khamul pays 1 Will to add +1 attack, wins the fight, knocks over his opponents, and puts his wounds into the banner, which is successfully wounded with no other model in base contact to take the banner. The Black Dragons also kill one of the Rohan warriors, and would you believe it? Eomer wins his fight but fails to wound the Easterling. Two of the Black Drags fall to the Huntsman and a warrior as well as another pair of warriors. So, in the final math:
Kill Count: Easterlings 29/36 (under 25%), Rohan 35/45 (under 25%)
For the final scoring, the game comes out as a 1-1 Draw. Considering how evenly matched the teams were, it doesn't surprise me that the scoring reflects that, :)
Conclusion
Glenstorm's Thoughts: Wow, wasn't that game bizarre? I don't think I've ever played a crazier game in my life, except maybe the Christmas Special Don and I did together about six months ago. This was one for the books, and an amazingly intense game for my first run at the Easterlings. On the whole, I love the list: it's got a lot of options (though definitely not as strong on magic as some of the other nazgul-based lists). I really like how Khamul offers a killing hero, with the possibility of gaining attacks, FV, and Strength if you need it. He's also the only ringwraith, I believe, that can get to S7 if you Bladewrath him, which I'll need to experiment with in future games. On the whole, I'm really looking forward to using this list more!
Donatello's Thoughts: One of these days, I'm going to beat Glenstorm, :) I really enjoyed getting to use his Rohan force, though, as I've faced it a few times, and Eomer is a really fun hero to use. Being able to charge with 4 attacks at S5 and F5 is amazing, and his versatility and movement make him exceptional for fighting armies that cannot clock the model count of Rohan. I'll likely try my hand at them again.
Stellar Unit for Glenstorm: Okay, you've got to give it to the Black Dragons. These guys pack F4 D6 and C4, which is elite infantry status for only 10 points. The Black Prince and Zorro like a slightly larger contingent of halberds (primarily because they are pike-supporting a lot of melee heroes, whereas I only pike support my Drag Knight), but I'm really glad I went with a 2-1 mix of Black Dragons and halberds.
Stellar Unit for Donatello: Eomer hands down. I know that we try not to give these awards to heroes, but honestly all of my other units were inconsistent at best. The Royal Guards held the line for a turn or two, but they died quickly to the Black Dragons. My archers were complete duds (which I expected, as I was faced a D6 army), and my other warriors were very unstable. The only steady force on the field was Eomer, so he earns this award.
I had a chance to play with Tavros on Saturday night, so I'm hoping to get that report up in the next few days. I wanted to test out a few of my new dwarf models, so I'll be using an Erebor + Wanderers in the Wild LOME list in that battle against one of his new builds for Moria. Check back on this space for more on that fight!
Until we meet again, you'll know where to find me,
Watching the stars,
Glenstorm
"Trivial hurts, tiny human accidents," said Firenze, as his hooves thudded over the mossy floor. "These are no more significant than the scurrying of ants to the wide universe, and are unaffected by planetary movements." ~ Firenze, Harry Potter and the Order of the Phoenix
Really liking the look of those Easterlings mate. As one Rhun player to another, the 2:1 DG/Pike ratio was interesting. The long shield wall is nice. I like to run it closer to 3:2 to bring the F4 of the dragon guards to bear - particularly against F3 or D5 civs, it makes a big difference in getting kills early on before the opponent has had time to wrap around.
ReplyDeleteOne tip on the DK though - he really is a grunt killer rather than a hero killer (unless you Bladewrath him). He spent what, 2-3 rounds up against a captain that the Dragon Guard would have been just as effective at killing (6s). He probably would serve you better if he had spent that time slaying grunts (or even shielding against Eomer - 6 dice and then a 50% chance of not being knocked down if he loses)
and was it just me, or were the Rohan guys super-couragous in charging/not fleeing from a nazgul with a -1 to their courage?
It was not just you - I literally hung my head when the DK ran on snake eyes and Rohan Warriors were rolling 10s and above for courage. It was brutal.
DeleteInteresting take on the Drag Knight. I'd likely agree in the aftermath of the battle - perhaps using him as a grunt killer for his primary purpose, and then throwing him into a combat with a hero when the hero's Fate store is depleted, giving him a chance to get back a Might point here and there. Hopefully playing more games with him will help me get a feel for his abilities.