

Dear Reader,
Christmas is a wonderful time of year! Full of its own comings and goings, including an excursion of the White Council against a wandering body of Uruk Trackers! Tiberius and I got together over the weekend to play test one of his other White Council builds against my Isengard forces. Following our fight with the Grey Company in a past post, Tiberius wanted another go with his White Council, and I gladly welcomed the chance to test a build I have never done: a straight Uruk Tracker force!
Being a LOTR Trading Card Game (TCG) player, the uruk scouts were always my favorite civ for Evil. Hands down. No question. But until very recently, I've never owned enough to make a 600-point list with just Isengard. Honestly, I was not looking forward to facing the White Council, but I was very interested in testing this new army set. Our lists looked like this:
White Council: 600 points
Gandalf the Grey: 170 pts
Glorfindel, Lord of the West with Armor of Gondolin: 140 pts
Celeborn with armor/elven blade: 140 pts
Thranduil: 90 pts
Arwen Evenstar: 60 pts (Stand-in: Bretonnian Damsel with sword - a new arrival at the How!!!)
TOTAL: 5 units (breakpoint: 3), 13 Might
Rager's Raiders: 602 points
Warband 1:
Ugluk: 60 pts (Army Leader)
12 Uruk Scouts with shields: 108 pts
Warband 2:
Vrasku: 60 pts
11 Uruk Scouts with bows: 99 pts
1 Orc Warrior with shield/spear: 7 pts
Warband 3:
Uruk Captain with armor/2H weapon: 60 pts (Stand-in: Orc Captain)
12 Uruk Scouts with shields: 108 pts
TOTAL: 39 units (breakpoint: 20), 8 Might
Scoring:
For our purposes, we will be running a Lords of Battle scenario (we agreed that we would be doing either To the Death or Lords of Battle, as both of us felt comfortable with those, and Lords of Battle won the roll-off). Scoring will look like this:
- Every time an enemy model suffers a Wound or expends a Fate Point, the player gains 1 Victory Point. Any unspent Fate Points on a model that is removed as a casualty will also give the player 1 Victory Point per unspent Fate Point.
- You score 1 Victory Point if you break the enemy army, and you score 3 Victory Points if you break the enemy army without your force being broken.
- Once an army is broken, roll a D6, and on a roll of 1-2, the game ends. If a 3-6 is rolled, continue for one more round, and roll again until the game is over, or one force is destroyed.
- SPECIAL RULE: Each time your force kills an enemy hero in a fight, one of your heroes involved in that combat (your choice) regains a single Might Point lost earlier in the battle.
These rules actually give both teams an even footing: one force will focus on quickly swarming and overpowering heroes to regain Might Points and quickly rake up wounds in order to break an army prematurely, while the other will seek to draw out the combat to break the enemy force and score more wounds than they can lose. It will be a battle of tactics, deployment, and the fateful rolls of the dice!
Tiberius's strategy: So after a tough game a few weeks ago against the Grey Company, I'm really looking forward to not having 5+ Foresight saves on the Uruk-Hai. I also realize that I'm facing a higher-defense army than I did last time and a higher strength army. I'm also interested in getting Arwen in the future (and I recently picked up Thranduil), so I wanted to let Radagast have a sit and try out the "Nature's Wrath" team that I recommended in a recent post.
Glenstorm's strategy: Okay - this game is purely experimental. It will be a pretty uphill battle for me: facing off against three casters, two of which have Nature's Wrath, with only three will points in the whole army is...gutsy...at best. I plan to make a frontal push with the Uruk Captain, run Ugluk's forces to the rear, and give cover fire (forcing him to rush into my forces) with my archers before pushing them into melee combat.
Deployment:
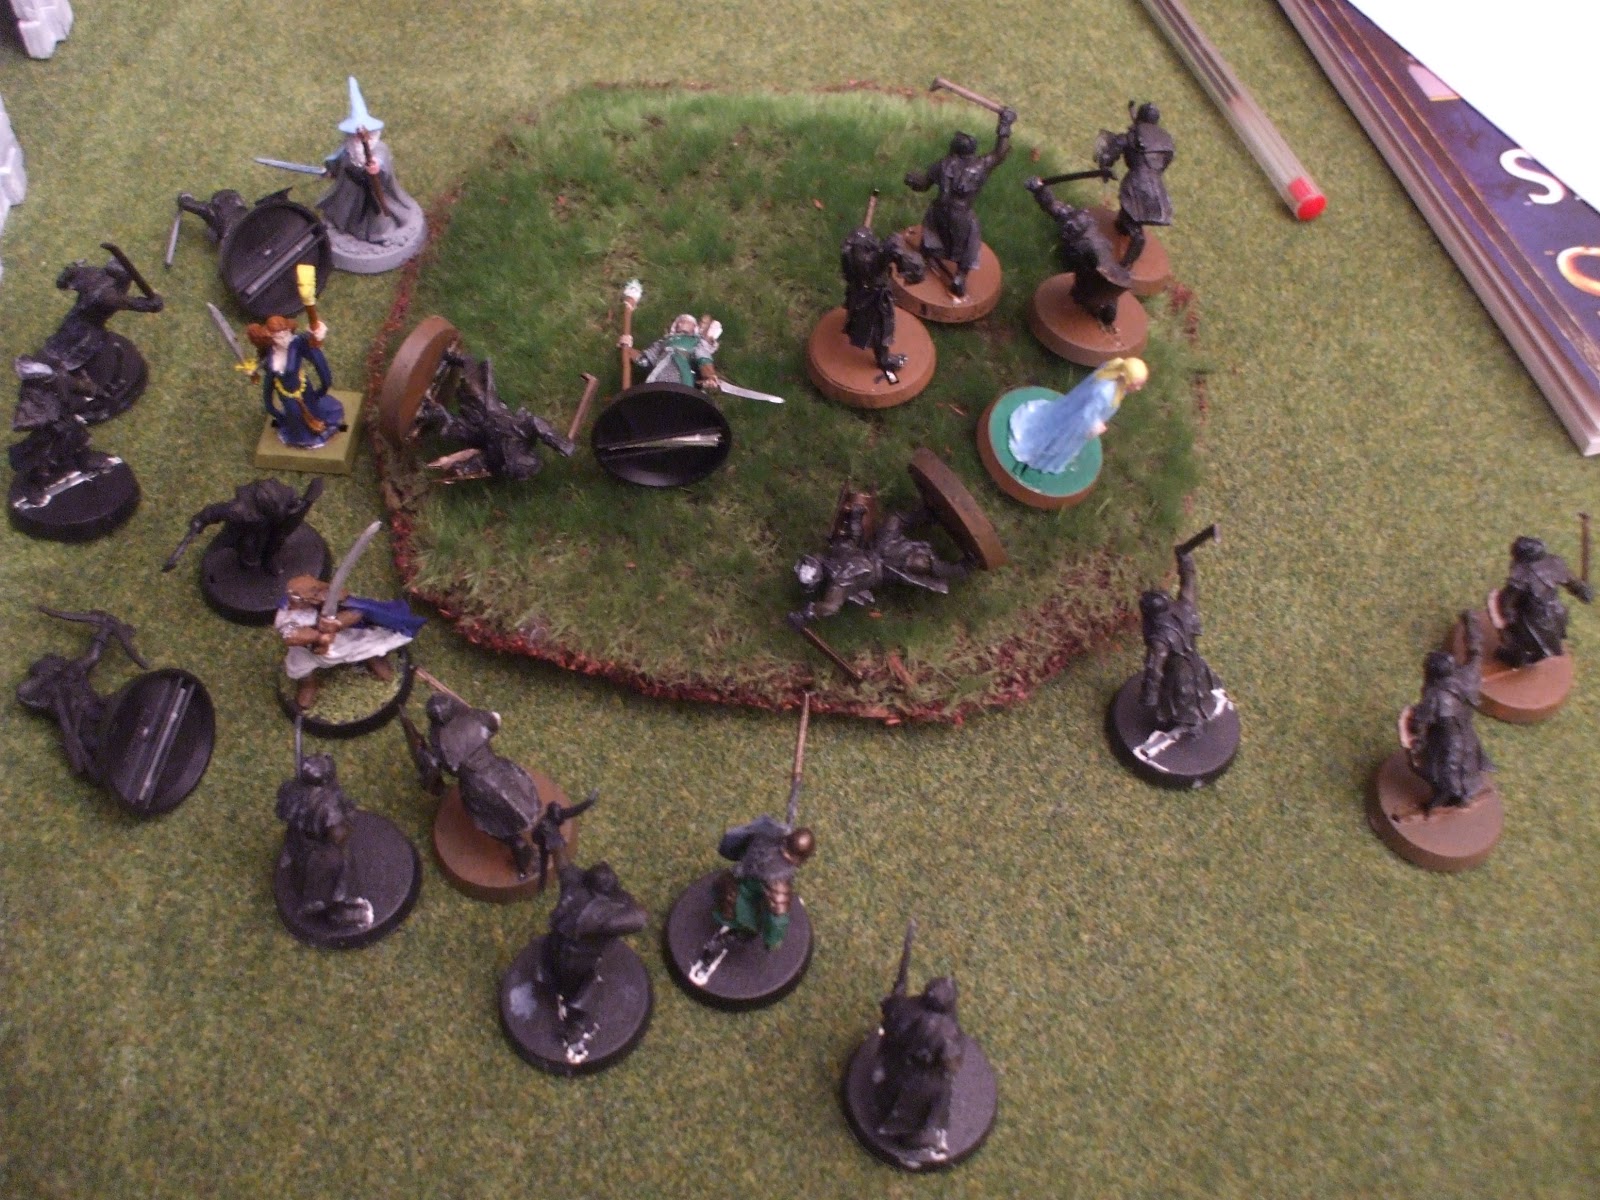
After rolling for deployment, the board looked like this:

Up top on one of the flets we also have a visitor sitting in on the battle: my first rendering of Malbeth the Seer! One of the exciting things for me this game was being able to showcase Malbeth ("Finally!") as an actual model, and my Bret Damsel. I really liked how they turned out, and you will see both in more close-up shots during the game.
With deployment settled... (Together: "FOR DEATH AND GLORY!!!")
Round 1: (P: White Council)

The armies start moving toward each other, and Gandalf casts Terrifying Aura successfully - a move that was noticeably absent in the last game ("Good move, Tiberius.") ("Thanks - not repeating last game."). Vrasku was 24" away from Glorfindel, but decided that now was a good time to move up and get to a stronger position.

In the shoot phase, Thranduil took down one of the Uruk Scouts in Ugluk's detachment. Other than that, there was nothing interesting in the Shoot Phase...unless you count all eleven of my archers missing their shots with Blinding Light not up ("Why do I buy these guys, again?"). We move to Round 2.
Round 2: (P: Uruk-Hai)

Before I began my Move Phase, I dared Tiberius to call a Heroic Move so that he would get in another round of magic. He took me up on my offer ("...if you insist..."), and...I probably should not have done that, :) Gandalf squared up, and aimed a well-placed Sorcerous Blast (1W + 1 Free) right down my uruk battle line onto my uruk scout. He sent the original scout about four inches back, killing two of my scouts and placing a wound on my Uruk Captain that was saved by Fate (1/1F, 1/2M). All of the rest of his heroes then began to engage the enemy, with the exception of Thranduil, who drew an arrow from his quiver. The rest of my army approached, Vrasku took a higher vantage point near Malbeth, the Uruk Captain's force engaged the enemy, and...
...We have melee combats!

In the Fight Phase, Glorfindel called a Heroic Combat, won the fight, and dealt one wound against the two men in his fight (2/3M), which ended the combat with no further movement ("Fail!"). Gandalf lost his fight against the Uruk Captain and a scout, resulting in two wounds from the captain ("Wounding on 3s...is sweet indeed!"), both fate saved (2/3F). Celeborn lost his fight, but does not take any wounds. Arwen, on the other hand, won her fight against the uruk scout, and finished him off with her might point (1/1M).
...Insert comment from a past post about warrior chicks, :) Also, now is a really good time to admire the amazing paint jobs that Tiberius did on Thranduil and Glorfindel, which has gone unsung on this blog to date. Anyway: when you're ready, we'll move on to Round 3.
Round 3: (P: White Council)
I was seriously tempted this round to call a Heroic Move, but opted not to, as my Uruk Captain would likely need his one remaining might point for combat. Thranduil moved to the top of the hill and cast Nature's Wrath. The Uruk Captain opted to resist with his single will point, and would you believe it! He rolled a 6! :) The spell was resisted, and Tiberius was both shocked at the resisting, and relieved that the new FAQ on Thranduil is not overpowered in his favor ("As am I, by the way.") ("Well, to be fair, requiring the roll of a 6 is kinda a high call, but it's nice that resistance is possible...").
The victory party was cut short by Thranduil charging into one of my scouts, Arwen standing in the exact same spot, and successfully cast...you guessed it...Nature's Wrath (2/3W) ("So not cool...") ("WOOHOO!"). With no other heroes in range with Will Points, the spell was cast, and all of my units within 6" of Arwen (including those already locked in combat) were knocked to the ground. Thankfully, most of my men had a chance to get up and promptly closed in for combat. Three of his heroes causing terror caused two of my men to be rooted in place, but that was all (Keep a tally though: it's important later on).
In the Shoot Phase, Vrasku squared up and took aim at Arwen, who was engaged in close-combat with an uruk scout. He took aim (2 successful hits), landed both on Arwen, and then rolled to wound:

...Do you ever have those moments when you look at the dice and say, "Really? Seriously?" Well, this was one of those moments (Malbeth to Vrasku: "Um...you know, at D3, there aren't many easier targets in the game....You know that, right?") (*Snarl*). My archers broke out into a sprint this round, anxious to get involved in combat, so the Shoot Phase ended on this note:

In the Fight Phase...everything went very well for Tiberius. Celeborn called a heroic combat and slew both of the Uruk Scouts in his fight (2/3M). He then went on and killed two more uruk scouts in the following combat ("Dude, that guy's a beast. Definitely keep him."). Arwen wins her fight against two uruk scouts, but fails to wound (Keep tally: she's 2/2 in winning fights so far). Glorfindel won his fight against the two shielding scouts on the ground, and killed both of them. Thranduil won his fight and slew one of the uruk scouts on the ground in his combat, and Gandalf won his fight and finished off the Uruk Captain with the 2H weapon, which, according to the scenario rules, restored 1 Might Point.
My only hope at this point: Vrasku lands wounds from range, and Ugluk gets beastly as he enters combat for the first time.
Round 4: (P: Uruk-Hai)
Tiberius (wisely) opted to take me at my bet again, and called a Heroic Move with Gandalf (using the Might Point he just regenerated), and lined him up with three dice to cast Sorcerer's Blast (4/6W + Free W), which he cast successfully (go figure). The result was 3 dead uruk archers, and a number of guys on the ground:

3 of 5 uruks hit - not bad. Interestingly enough, however, he failed to wound the initial uruk (needed a 4+), and the guy with the dice next to him. Tiberius rolled a 4, required a 5, and Gandalf was out of Might Points ("Still a really good magic phase for you, though.") ("Yeah, not bad for a day's work...").
The rest of my men began to engage - or, at least, that was the plan. As you will recall, Tiberius has three units that cause terror in this army: Celeborn, Glorfindel, and Gandalf (per Terrifying Aura on Round 1). A number of my boys...got cold feet...about attacking, which left a number of them standing around as we entered the Shoot and Fight Phase.
I chose to engage Arwen with 3 uruk scouts again, and Vrasku lined up the shot. He successfully hit with both bolts (1/3M), landed both on Arwen, and this is what he rolled to wound:

(Malbeth to Vrasku: "Okay: now you just officially suck...") (*snarl*)
...Yeah. That says it all. (*Hangs head* "Why do I pay for you again, Vrasku?") The one thing that the picture also shows you, though, are the 6-7 units that failed to charge during the Move Phase due to terror. Also a serious problem ("ROOOAAARRRR!").

In the Fight Phase, Ugluk calls a Heroic Combat and successfully slays Thranduil using all 3 of his Might Points ("Ouch..."). This regenerates 1 Might Point for Ugluk. He then moved into the fight with Celeborn, and the bloodbath continued!
...I just wish I could say it continued in the same fashion, :) Celeborn squared up, won the fight on a "6," and slew one of the uruk scouts in his fight (after unsuccessfully attempting to wound Ugluk twice). Arwen slew the uruk scout in her fight, as did Gandalf and Glorfindel ("Barely...").
Wound count so far: White Council has lost 6 wounds (between wounds and fate: 2 fate on Gandalf, and 2 fate + 2 wounds from Thranduil), and the Rager's Raiders have lost 23 wounds and 20 units - which is a broken force.
We do not roll a 1-2, so the game continues...
Round 5: (P: Uruk-Hai)
Ugluk takes no chances: since it doesn't count as a wound caused by my opponent, I use Ugluk's Head Taker rule while he is on the hill, and call a 12" "Stand Fast!" that all of my units can see. Very nice. He then moves in on Arwen ("Because I badly need to score wounds, and wounding on 3s due to S5 looks really good right now!"), and then Vrasku tests. He rolls:

So, he stands! ("Buddy, why can't you do that when you're shooting?!?!!?!") No one is in range of his "Stand Fast!" but all of my other Uruk-Hai are in the range of and can see Ugluk. My men then swarmed the remaining units, with another 6-7 units being rooted by terror. This isn't usually a problem, except when everyone who aimed at one target ended up being rooted. And it's an even bigger problem when that unit is a spell-caster.
...And it's an even BIGGER problem when that spell-caster wears a grey, pointy hat and gets a free will point, which he put to good use this round when he immobilized Ugluk, who failed to resist (1/1W). Ugluk now has F1, 1 attack, and cannot strike wounds if he wins. Oh - and did I mention that Gandalf promptly charged him, removing him from the fight with Arwen, and landing him in a slugging match with the Grey Pilgrim? Oh. Joy... ("You know that's right...")
In the Shoot Phase, Vrasku finally decides that it is time to get serious about this whole "war thing," and successfully lands a hit on Arwen, while simultaneously failing to wound his own uruk scout ("Much appreciated there, bro."). Arwen spends her Fate Point, and fails to save the wound (1/1F, 1/2H).
In the Fight Phase, Arwen wins her fight ("...again...") (are you still keeping a tally? She has not lost a fight yet...) and successfully wounds one of the uruk scouts. Gandalf loses to Ugluk (believe it or not), but Ugluk is unable to strike wounds, so nothing happens. Celeborn successfully defends himself against the four invaders against him, and Glorfindel wins his fight and slays one of the inbound trackers. We then rolled the dice, and on a "1," the game was ended.
Final Wound Count: White Council (5 Fate, 3 Wounds) wins over Rager's Raiders (2 Fate, 25 Wounds), with another 3 points for Tiberius due to his army not being broken while breaking the enemy army, giving a final score of 30 - 8, for a Major Victory for the White Council.
Conclusion
Thoughts from Tiberius: Wow, what a game. The Nature's Wrath duo worked for a single turn only, but it was really fun. Having a D3 player this game made me a little worried (and one good round of archery from Vrasku more and she would have died), but in the end, it worked out just fine. I was surprised at how often my 1 Attack units (Arwen and Gandalf) won their fights by rolling 5s or 6s, so that probably had something to do with how well the game went. Celeborn was, as normal, a beast and did well with Celeborn keeping the enemy off my tail so Glorfindel and the spell-casters didn't get swarmed (too badly).
Thoughts from Glenstorm: Sure enough, my fears were realized: the magic tore my lines up, the terror-causing heroes rooted critical forces in place when I needed them to swarm for wounds, and the low store of Will Points allowed Tiberius to gain a severe tactical advantage over me at critical points in the match. What I did not expect, however, was the sheer hardiness of two heavy-hitting, terror-causing heroes: Glorfindel and Celeborn. Together, these two elves create a formidable line of high defense, high fight value, S4 heroes that are hard to engage and even harder to finish off. Couple them with a few casters and an archer, and you have a very versatile force that can sustain a lot of punishment. The tactical award in this match definitely goes to Tiberius, and I raise my scimitar to him.
Stellar Unit for Tiberius: Celeborn with Elven blade and shield. I love this guy - for 140 points, it's good to have a brawler who can also cast magic (and who causes terror). It's really fun to use him in conjunction with other stellar heroes and he never lets me down. One of these days, I want to give him heavy armor too, so I can run around with two D7 brawlers (between him and Glorfindel). But that's going to need to wait for another day, as we shift our focus away from the White Council and towards the Dwarves and Goblins as we begin Hobbit Month!
Stellar Unit for Glenstorm: Uruk Scout with Shield. Not going to lie: these guys take a beating, die in droves, and generally get the thankless task of my army - hold down the enemy so that Ugluk and the captains can kill them all. That being said, they successfully surrounded opponents, held the ground, and kept the enemy down to make way for my other units. Even though their kill count was "0" today, I really do respect these guys for the invaluable role they play in this force.
As we move through December, I've primarily been busy working on basing a number of my Rohan forces, though, as you can see from this battle report, my Uruk-Hai could use some work as well. I may end up devoting January to them, but we'll see, :)
In the meantime, may your days be merry and bright,
Watching the stars,
Glenstorm
"Will they follow me?" ~ High King Peter
"To the death." ~ Oreius the Centaur
No comments:
Post a Comment